Posts

Showing posts from June, 2022

How should solve the whirlpool air conditioner troubleshooting

Image
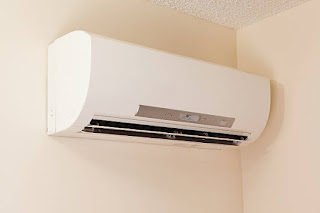
  If you're looking for help fixing your Whirlpool Air Conditioner, look no further! Our comprehensive Whirlpool Air Conditioner Troubleshooting guide will explain common issues. Not cooling whirlpool air conditioner If the air filter is clogged, air cannot flow properly through the air conditioner. This greatly reduces the cooling capacity of the air conditioner. In addition, if the air filter is clogged, the evaporator coils will frost over. To remove debris from the air filter, try cleaning the filter. If it is not possible to clean the air filter, replace it.  Fan not working whirlpool air conditioner The dual shaft fan motor (or circulation fan motor) might be defective. The circulation fan motor has two fan blades: one on either side of the motor. On one side, the fan blade draws in outside air over the condensing coil to dissipate the heat. On the other side, the fan blade directs the air over the evaporator coil. The dual shaft fan motor has bearings that can loosen or bind

How to do deep clean Maytag oven

Image
  When you think about cleaning your kitchen, you probably envision putting away dishes, scrubbing the sink and cooktop,  or wiping down your countertops . While all of this is important, there may be one corner of your kitchen that you’ve been neglecting. Cleaning your oven is usually the last chore that comes to mind, but it’s still important – a dirty oven not only looks bad, but it can also cause charred food to smoke up your kitchen or may infuse your favorite dish with bad smells or tastes.   Our comprehensive guide will teach you how to clean every part of your oven, including racks and glass doors. With these simple steps and a little bit of time, you’ll be on your way to a truly clean appliance. For cleaning oven racks what we’ll need ·  Water  ·  Dish soap or laundry detergent  ·  Old towels  ·  A rag or dishcloth  ·  A stiff-bristled cleaning brush FOR CLEANING MAYTAG OVEN'S INTERIOR AND GLASS DOOR ·  Baking soda  ·  Water  ·  Cleaning gloves  ·  A rag or dishcloth  ·  A

How to clean smelly Samsung dishwasher

Image
  Even if your dishwasher produces sparkling results, bad odors can make even the cleanest dishes seem dirty. What should I do when my Samsung dishwasher smells bad? Cleaning the interior and filter and eliminating clogs can reduce odor. Learn how to clean a Samsung dishwasher with simple steps that pinpoint odor at the source. While regular cleanings are crucial to reduce and prevent odor, they also ensure optimal operation and prevent repairs. But before we detail our simple cleaning steps, it’s important to know why your Samsung dishwasher smells bad. Before getting the instructions, consider the possible reasons for your smelly dishwasher. While cleaning the dishes, the bits of food and particles of grease and oil washed off can be stuck around after the cleaning cycle has been completed. Food particles build up and cause trouble in a few different places in the dishwasher are: The filter or screen. Sprayer arm ports. The bottom lip inside the door. Your dishwasher is a warm, moist

How to fix noisy Frigidaire refrigerator

  Common solutions for   Frigidaire Refrigerator   is  noisy  or loud 01 - Fan Blade If the  refrigerator  is  noisy  or loud, especially when one of the doors is opened, either the evaporator or condenser fan blade may be at fault. First, check out the evaporator fan blade in the freezer behind the back panel. Normally, the refrigerator runs silently without making other noises. But, over the usage, your refrigerator may make sounds. If your fridge is making abnormal noises, you need to focus on its causes and fixes. Today, we are here to take you on a guide to possible causes of refrigerator noise and how you can solve them. Find out where that noise is coming from and get ideas for  how to fix noisy refrigerators Fan Blade: If the refrigerator is noisy or loud, especially when one of the doors is opened, either the evaporator or condenser fan blade may be at fault. First, check out the evaporator fan blade in the freezer behind the back panel. Try turning it by hand. If the fan blad

Best home appliance cleaner

Image
If appliances are dirty, their visual appearance is not only affected. Beyond what the machines look like on the outside, they are not able to function as effectively when dirt, grime, food, and other substances begin to build up within the appliance. If grime or grease has started taking over your appliances, it's time to implement a cleaning routine that can relieve the buildup. However, it's the best choice of cleaning in an effective and relatively inexpensive form of preventive maintenance you can do yourself in your free time So, you can clean these appliances with general methods or any  appliance cleaners . To help you more, we are supplying kitchen appliance cleaners. Use these appliance cleaners that help remove all residues, dirt, and dust particles. Whatever appliance you use in your kitchen, you can find your required stainless steel appliance cleaners. And, make all your appliances work and look great. Browse our available cleaners to find the appropriate one for

How to install MarketAir rough-in boxes

Image
Install Lineset and Cable First, line up the  RoughinBox base with the mark on the studs. Insert the box in between the studs and attach it in place by using the four integral mounting brackets. MarketAir RoughinBox Installation Preparing the RoughinBox Select 1/2 inch or 1/4 inch port as needed when you are using a cable port. Now, you have to cut as X marked on the top of the port with a utility knife and push the cable through the opening. This will create an integral strain relief bushing for preventing the cable from pulling out by itself. If your box includes five lineset ports one on each end, one on the bottom, and two on top. For the bottom or top line ports, line sets from the evaporator should run from right to left so facing front of RoughinBox. You have to try always to bring lineset into the box from the left to avoid a difficult connection to the evaporator. Make sure that you keep lineset entry orifice as small as possible by using the cut lines available on top of

How to install the solar panels at home

Image
Installing Panels on a perfect Roof  For your  solar panels  to determine the correct spacing for the stanchions. Use a measuring tape and marking chalk to identify the position of each stanchion. It’s vital that each stanchion is located directly above a roof rafter—rafters are the wood "ribs" that provide the shape and structural support for the roof. With some experience, you can locate roof rafters beneath the shingles, flashing, and sheathing by tapping a hammer and listening for the difference in sound. Otherwise, you can measure from protruding objects like chimneys or exhaust pipes, or drive several pilot nails through the roof and use their location to guide your measurements. No part of this job is suitable for a novice. If you’re not fully confident about working on a roof and installing the solar panels correctly, hire a professional installer!. Attach the     stanchions grilling them into the roof rafters   Mark the locations for your pilot holes, then drill thro